I have issues with meat doneness. Before I got my cooking thermometer, I was a total mess. Now I’m just somewhat of a mess. I’m trying to get better about predicting doneness without my thermometer, but it’s not something that comes easily to me. Some things, I have down. I know I can sauté a chicken breast half in 7-8 minutes. I also know I can do a burger, 1/3 of a pound, to well done in 8-9 minutes. Beyond that, it’s a guessing game for me. So I usually stick with my thermometer. If I have meat cooking in the oven, you can bet it’s been spiked with a metal probe.

When I came across a recipe for broiled pork tenderloin that claimed the pork would be ready in 12-16 minutes, I was skeptical. In fact, I almost didn’t try the recipe. I’ve been in that situation where the meat isn’t done when you think it should be and you have to keep putting it back in the oven and checking it and waiting for it to finish while all your sides are either getting cold or are still over the heat and turning to mush. I can’t be bothered with that—I’ll find a recipe whose cooking times seem reasonable, thankyouverymuch. But I just couldn’t toss aside this recipe. It seemed so delicious and easy. And it was from Everyday Food, so I thought the cooking times were probably accurate, and I didn’t even use my thermometer. This recipe calls for turning the meat, which can be made a bit complicated when there’s a thermometer sticking out of it that’s attached to a cord that’s attached to a digital unit on top of your stove. I didn’t want to have any complications that close to the broiler (I’m also prone to burning myself), so I left the thermometer out.

Which was, of course, stupid of me. It wouldn’t have been that hard to use it, and I should have, because when I took the meat out after 16 minutes and checked it with my instant-read thermometer, it was only at about 130, 15 degrees off from where it should have been.

Have I mentioned yet that this pork was on a sheet tray along with some delicate vegetables, like snow peas and scallions? Well, it was. So there I was with a pan of charred vegetables and undercooked pork. I tossed the vegetables around, tried to shelter the already-charred ones beneath the not-yet-charred ones, and put the meat back in for a few minutes. I’ll spare you the entire saga, but I will tell you that I had to do that two more times before the pork was done, and the final time my instant-read hit the 155-degree mark and just kept on going, so in the end the pork was overcooked. So, yeah, remember how I started out saying that I have issues with meat doneness? This is what I meant.

If you are crazy and rebellious and don’t mind hovering around your broiler and would like to prove to me that my cooking skills, not the recipe, are what’s at fault here, please do so and report back with the results. It’s entirely possible I screwed up, although I don’t really see how. I will admit, though, that there are three reviews of this recipe online, one of which reports an experience even worse than mine, and two of which were a success. And, here’s the kicker: I actually still like this recipe—the sauce was yummy, the ingredients worked well together, it’s simple in concept—and I’ll probably try this again. I will not, however, ever attempt this again without using my thermometer right from the start. If you try this recipe and have an oven-safe cooking thermometer (as opposed to instant-read), please use it. I suggest putting the meat and veggies under the broiler, cooking for 8 minutes, tossing the vegetables well and flipping the meat, then placing them back under your broiler until the meat reaches the desired temperature. According to the recipe, that temperature is 145, although that seems a bit low to me. Other sources I’ve seen say pork should be cooked to 160. It’s true the meat will continue cooking a bit as it’s resting, but will it really go up 15 degrees? I have no idea. I mean, I don’t actually know how to cook. You knew that, right? I think I’ve made it pretty obvious here.
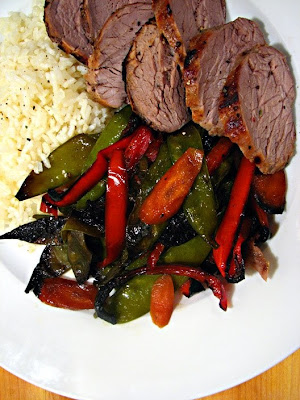
Honey-Glazed Pork with Asian Vegetables
From Broiled Soy-Glazed Pork with Rice and Asian Vegetables
1 1/2 cups long-grain white rice
8 ounces snow peas, trimmed
2 medium carrots, thinly sliced on the diagonal
2 red bell peppers (ribs and seeds removed), thinly sliced
1 bunch scallions, ends trimmed, cut crosswise into 3-inch lengths
2 tablespoons vegetable oil
1/4 cup reduced-sodium soy sauce
Coarse salt and ground pepper
1 pork tenderloin (1 to 1 1/4 pounds), halved crosswise
1/4 cup honey
Cook rice according to package instructions; cover, and set aside. Meanwhile, heat broiler with rack set 4 inches from heat. On a large rimmed baking sheet (cover with nonstick foil, if you have it), toss snow peas, carrots, bell peppers, and scallions with oil and 2 tablespoons soy sauce; season with salt and pepper.
Place pork on top of vegetables, and season with salt, pepper, and 1 tablespoon honey. If you have an oven-safe thermometer, insert it into the thickest part of the meat and set it for 145 degrees. Broil until pork and vegetables begin to char, 8 minutes. Toss vegetables and turn pork; drizzle pork with 1 tablespoon honey.
Continue to broil until alert sounds or until an instant-read thermometer inserted in thickest part of pork registers 145 degrees and vegetables are charred in spots, at least 6 to 8 minutes, tossing vegetables once more. Remove from broiler. Cover with aluminum foil, and let rest for 10 minutes.
In a small bowl, make sauce: Stir together remaining 2 tablespoons soy sauce and honey. Thinly slice pork and serve with vegetables, rice, and sauce.


 You know, sometimes I just don’t have a story to go along with a recipe. I made this Chinese Chicken Salad last week and haven’t posted about it until now because I couldn’t think of what I should write. But you know what? I think this one mostly speaks for itself. It’s easy. It’s healthy. It’s colorful. It’s delicious. Nuff said.