Wednesday, July 16, 2008

Veggie Lover's Taco Salad

When I was growing up, there were a bunch of regularly made meals that basically formed the foundation of my childhood dinners. One of those meals was taco salad. My mom loves chili and made it all the time, and the day after chili day was always taco salad day. She’d pile some Tostitos, iceberg, and tomatoes on a plate, always in that order, and top it with some leftover chili, some cheese, and some sour cream. I loved it then, and I still love it now.

My approach, however, is somewhat different from my mom’s. First of all, I can’t eat a dish the same way all the time. That’s boring. Second, I can’t be bothered to make a pot of chili every time I want taco salad. That’s crazy. Third, I’m not even sure how chili got all muddled in with taco salad in the first place. Does everyone use chili for taco salad, or is that just my mom?

Anyway, I like Martha Stewart’s recipe for taco salad. It’s easy, healthy, and delicious. No chili here. Martha calls for lean ground turkey mixed in with lots of veggies: onion, jalapeño, zucchini, and red bell pepper. The zucchini may sound unusual, but it’s really a nice addition. You don’t exactly notice the zucchini itself, but it does lend a nice depth of flavor. I think corn would have been a great addition to the mixture, and though the thought occurred to me too late this time, I’ll definitely be including it in the future. I spooned the turkey mixture over tender Bibb lettuce and topped it with even more veggies, including tomatoes, radishes, scallions, and avocado. I served the salad with multigrain tortilla chips and, of course, sour cream, and had a delicious, filling, and healthy meal.

Veggie Lover’s Taco Salad
Adapted from Turkey Taco Salad

2 tablespoons olive oil
1 large onion, diced
3 cloves garlic, mined
1 pound ground turkey
1 medium zucchini, diced
1 red bell pepper, ribs and seeds removed, diced
1 jalapeno, ribs and seeds removed, minced
1 tablespoon chili powder
1 1/2 teaspoons cumin
Coarse salt and ground pepper
1 head Bibb lettuce, leaves separated
1 1/2 cups crushed tortilla chips
1 cup shredded white cheddar
Garnishes: sliced radishes, diced tomato, jalapeño slices, avocado, sliced scallions, lime wedges, hot sauce, sour cream

Heat oil in a large skillet over medium-high heat. Add onion and jalapeño and cook, stirring often, until onion is translucent, 5 to 7 minutes. Add garlic and cook for 1 minute. Add turkey; cook, stirring often, until starting to brown, 5 to 7 minutes.

Add zucchini, bell pepper, chili powder, and cumin; cook until vegetables are crisp-tender, 5 to 6 minutes. Season with salt and ground pepper. Transfer to a plate, and let cool.

Arrange lettuce leaves (torn or shredded, if desired) on dinner plates and top with crushed tortilla chips. Ladle some turkey mixture onto each plate and top with cheese. Add garnishes as desired.

Thursday, July 10, 2008

Chili and Polenta Bowls

I’ve gone on about my love of chili before, but I’m going to do it again. I’m sure this won’t be the last time, either, just so you know. But I can’t help it. What I love most about chili is its versatility. Not only are there a million ways to make chili, but there are just as many ways to serve it. I’ve had it over rice and mixed in with rice. I’ve had it over burgers and over hot dogs, stuffed in poblanos and in burritos, and mixed with cheese for a fantastic dip. All these possibilities, and I haven’t even gotten to corn yet. Chili and corn have a natural affinity for each other. No really, I mean it. Chili and corn bread? Come on. Chili tamale pie? Yes, please. And now, my newest chili experience, chili and polenta bowls.

This is another terrific idea from Rachael Ray. Just pile some polenta into a bowl, make a well in the center, ladle in some chili, and there you have it. Chili and polenta bowls. They’re fabulous. I don’t know how many other people are eating chili right now—I mean, it’s more of a winter dish, right?—but I could never go three months without it. And there are plenty of ways to make it more fitting with the season. I added frozen corn to mine, but fresh corn scraped off the cob would be even better. You could add some grilled veggies or, instead of mixing canned tomatoes into the chili, top the dish off with some fresh salsa. Or, my favorite idea, top it with some fresh chopped avocado and a squeeze of lime. Served with some margaritas, that’s a perfect meal any time of year.

Chili and Polenta Bowls
Adapted from Chunky Chicken and Chorizo Chili

This makes a very thick chili. If you like yours a bit thinner, you can add some extra liquid in the form of beer, chicken stock, or crushed tomatoes. Just add the desired amount at the same time that you add your tomatoes.

1 tablespoon extra-virgin olive oil
3 links fresh chorizo
1 pound ground turkey
1.5 tablespoons chili powder
1/2 tablespoon ground cumin
1 onion, chopped
1 jalapeno, finely chopped

3 cloves garlic, finely chopped
1 cup frozen corn kernels
1 (14.5 ounce) can diced tomatoes
1 (15 ounce) can black beans
Salt and pepper
3 cups chicken stock
1 cup quick cooking polenta
1 tablespoon butter
1/2 teaspoon dried thyme
Garnishes: chopped scallions, shredded cheese, sour cream, chopped avocado

Heat a deep skillet over medium-high heat with 1 tablespoon extra virgin olive oil. Add chorizo, break it up a bit with a wooden spoon, and allow to cook until meat begins to brown, about 5 minutes. Push the chorizo off to the sides of the pot and add turkey. Brown and crumble the turkey for 5 to 6 minutes. Season with chili powder and cumin. Add the onions, garlic, and jalapeno and cook another 5 to 6 minutes or until meat is no longer pink. Add the beans, corn, and tomatoes with their liquid and heat through. Season the chili with salt and pepper, to taste, and allow to simmer, covered, while preparing polenta.

Bring stock to a boil in a medium pot. Stir in polenta, and keep stirring until the polenta masses and thickens to a porridge, about 2 minutes. Stir in butter and thyme and season with salt, to taste.

Fill bowls half-way with polenta. Spread polenta up sides of bowls, making a well in the center of each bowl. Fill up bowls with chili, top with desired garnishes, and serve.

Sunday, July 6, 2008

Southwestern Salad and Cornbread Puddings

We’re all eating more salads now that the warmer months are here, right? I certainly am. I try to plan a salad for a main course meal at least once a week. Salads are cool and refreshing when it’s hot and muggy outside, and they’re fast and simple to throw together. The only problem for me is that they’re not very filling. I have a big appetite, and lettuce doesn’t always cut it. I usually fill my salads with lots of yummy extras, but I still often like to have something on the side. Crusty rolls or breadsticks are a reliable option, but sometimes I like to change it up a bit.

First, the salad. I made Chopped Salad with Spicy Pork and Buttermilk Dressing, with some modifications. I made it vegetarian (not to mention cheaper) by substituting black beans for pork, and I took the seasonings that were meant to flavor the pork and simply added them to the dressing. This worked very well. The salad was substantial yet light, and the dressing was creamy and spicy. All it needed was the prefect companion.

I considered serving it with some blue corn chips. Those would work well with the salad’s southwestern flavors, and the crunchiness of the chips would provide a nice texture contrast, especially since this salad doesn’t have any croutons. I thought that would be too easy, though. The salad was such a cinch to make that I thought I could spare some time and make something a bit more special, so I turned to my trusty recipe queue (category: side dishes) and found Martha Stewart’s Mini Cornbread Puddings. Perfect! I’d been wanting to make these for a while.

The idea behind calling these “puddings” is that they’re much moister than regular cornbread, thanks to a healthy helping of sour cream in the batter. I adore the name (“mini puddings” just sounds so cute), but, after making these, I wouldn’t exactly say they’re pudding-like. The word “pudding” makes me think there will be an ooey-gooey center, and these don’t have that. They have more of a spongy texture, which means they’re not crumbly at all. They hold together very well and are just the right size to pop in your mouth. Fresh from the oven they went very well with the salad, but the next night I lightly grilled the leftovers, brushed them with garlic butter and sprinkled lightly with salt, and thought they were even better.

Black Bean and Corn Salad with Garlicky Buttermilk Dressing
Adapted from Chopped Salad with Spicy Pork and Buttermilk Dressing

1/2 cup low-fat buttermilk
3 tablespoons mayonnaise
2 scallions, whites minced and greens thinly sliced, separated
1/4 teaspoon chili powder or chipotle chile powder
1 garlic clove, crushed through a press or grated with a microplane
Salt and pepper
1 head romaine lettuce (1 1/4 pounds), trimmed and chopped
1 package (10 ounces) frozen corn kernels, thawed and patted dry
2 ounces pepper-jack or colby-jack cheese, cubed

Make dressing: In a large bowl, whisk together buttermilk, mayonnaise, scallion whites, chili powder, and garlic; season with salt and pepper.

In a separate bowl, toss together romaine, corn, beans, cheese, and scallion greens. Drizzle with dressing and serve immediately


Mini Cornbread Puddings
From Martha Stewart

Butter, room temperature, for pan
1/2 cup all-purpose flour (spooned and leveled)
1/2 cup yellow cornmeal
2 tablespoons sugar*
1 teaspoon baking powder
1 teaspoon salt
1/4 teaspoon baking soda
1 large egg
1 1/2 cups sour cream
1 package (10 ounces) frozen corn kernels, thawed and patted dry

Preheat oven to 425 degrees, with rack in upper third. Butter 24 mini muffin cups; set aside. In a medium bowl, whisk together flour, cornmeal, sugar, baking powder, salt, and baking soda.

Make a well in center of flour mixture. In well, whisk together egg, sour cream, and corn. Mix with flour mixture just until incorporated (do not overmix).

Dividing evenly, spoon batter into prepared muffin pan. Bake until tops have browned and a toothpick inserted in the center of a muffin comes out clean, 10 to 15 minutes. Let stand 5 minutes in pan; turn out onto a cooling rack. Serve, or cool completely and store at room temperature in an airtight container, up to 2 days.

*These cornbread puddings are not sweet. If that’s what you’re after, add a little extra sugar.

Thursday, July 3, 2008

Noodle Love IX: Rice Noodles

This wonderful Thai Chicken and Rice Noodle Salad is another gem from Everyday Food. I've never before cooked with rice noodles, and to be honest I can't even recall if I'd ever eaten them before making this recipe. They're sort of foreign to me, and I generally tend to shy away from foods I'm unfamiliar with. I either think they'll be too hard to make or I won't like them. Well, this recipe proved me wrong on both counts. This rice noodle dish is easy to make and delicious. In fact, making it made me wonder why I don't see these noodles being used more often. They cook up so much faster than any other kind of pasta that I'm surprised I haven't seen them featured in a thirty-minute meal. No matter. I've found them now, and I'll be looking forward to finding more ways to use them.

So, as I said, this recipe is E-Z. The hardest part is chopping the vegetables, and that's not hard at all, just a bit time-consuming (but not too much so). The noodles are a breeze to cook. They're literally ready in two minutes. The chicken cooks up super-fast, too, because it's sliced very thinly. To help get those thin slices, you can pop the chicken in the freezer a bit until it firms up. It's much easier to slice a firm piece of meat than it is a squishy one. Personally, I always have a supply of boneless skinless chicken breasts in the freezer, and I just move some to the fridge the morning I'll be preparing the dish and slice them up before they've fully thawed. Of course, a sharp knife helps, too.

This salad is light and perfect for summer. The noodles don't have much flavor themselves, but they take on the flavor of the sauce, which is basically jazzed up soy sauce and rice vinegar. It's super yummy. Plus, this is the kind of dish that can please just about anyone, because you can choose your own toppings. For example, if you're serving it for a family meal, I recommend giving everyone a dish of noodles and chicken (or pork or beef), and setting the sauce and toppings out buffet-style so everyone can assemble their own salad. I used carrots, cucumber, alfalfa sprouts, radishes, scallions, basil, and peanuts.

Finally, I just think it's pretty. I don't always get excited about vegetables, but there's something about the colors of this dish that just makes me want to dig in. So we've got easy, delicious, and pretty. I'm sold.

Thai Chicken and Rice Noodle Salad
Adapted from Everyday Food

Spicy Asian Dressing
4 thinly sliced scallion whites (reserve tops for garnish)
2 minced garlic cloves
1/2 cup soy sauce
1/2 cup rice vinegar
2 tablespoons light-brown sugar
1 tablespoon fresh lime juice
1/4 teaspoon red-pepper flakes

1 1/4 pounds boneless, skinless chicken breasts, thinly sliced crosswise
Coarse salt
3 1/2 ounces thin rice noodles
1 tablespoon vegetable oil
2 carrots, sliced into ribbons with a vegetable peeler
1 English cucumber, halved lengthwise and thinly sliced crosswise
1/4 cup fresh basil, torn
Alfalfa sprouts, sliced radishes, chopped peanuts, fresh mint leaves, red-pepper flakes, and sliced scallion greens, for garnish (optional)

Combine all dressing ingredients in a medium bowl and mix until sugar has dissolved. Transfer half of dressing to a resealable plastic bag, add chicken, and marinate at room temperature for 30 minutes (or refrigerate up to overnight). Reserve remaining dressing for serving.

In a large pot of boiling salted water, cook noodles until tender, about 2 minutes (times may vary depending on the thickness of your noodles—check package instructions). Drain, and rinse under cold water to stop the cooking. Transfer to a platter.

In a large skillet, heat oil over medium-high. Working in batches, cook chicken (do not crowd skillet) until cooked through and nicely browned, about 2 minutes; transfer to platter on top of noodles.

Top with carrots, cucumber, and basil. Drizzle with reserved dressing, and sprinkle with garnishes, if desired.

Sunday, June 29, 2008

Noodle Love VIII: Lasagna

Although now I, happily, spend much of my time cooking for a man, I did, in my more youthful and culinarily inexperienced years, enjoy having a man cook for me. My junior year in college, I lived in a single-person dorm that was the size of a walk-in closet, and, with no kitchen of my own, my meals usually consisted of ice-cream scoop-mounded piles of the cafeteria's mystery meat du jour. But sometimes I'd pack a bag and leave campus for a weekend and be served food—delicious food—that was made just for me by a man who enjoyed indulging my every request. There were dishes I asked for over and over again, pepperoni bread and crab-stuffed chicken breast being the most frequent two. But sometimes he'd plan the meals and I'd sit at the kitchen table, greedily sipping glass after glass of wine, waiting impatiently for whatever was being prepared for me.

He liked to use onions, an ingredient which, at the time, I insisted I didn't care for. He used so many that the smell would permeate the air of his small apartment and I'd rub my watering eyes and complain that I didn't know why he had to use so many onions. He'd refill my glass and chop another onion.

The particular meal I'm thinking of now was lasagna. The man may have turned out to be a dud, but the lasagna was not. It was delicious, and I still remember it as the best lasagna I've ever had. I don't know how he made it—at the time I was interested in eating, not cooking—but, besides the onions, I remember that the sauce was heavy on red wine. When the weekend was over, I returned to my dorm, lasagna-filled Tupperware in tow, and stored the leftovers in my mini-fridge. In the following days I ate the leftovers cold from the fridge for breakfast—then, breakfast was around 11:00 am—and it was as good cold as it had been warm.

These days, I'm with a man who is wonderful but whose overly picky tastes threaten to cramp my budding culinary repertoire. He's not impressed in the least with Italian food, he insists that all pasta is the same, and he hates tomatoes and ricotta cheese. What is a lasagna-loving girl to do?

Well, I make it anyway, that's what I do. But only rarely, and only when I find a recipe that seems especially tasty. I thought maybe Martha Stewart’s Lasagna Primavera would get by Adam. There are no tomatoes in it, after all, and it’s filled with veggies, so I thought I could pass it off as health food. But he didn't like the ricotta or the frozen spinach, which is the latest addition to his growing list of dislikes. He ate one piece of the lasagna, and only after he'd doused it in Red Hot.

I hope that, in telling you this, I'm not doing this lasagna a disservice. Adam is strange and peculiar and you can't go by his tastes. But you can certainly trust me, and I'm telling you that this lasagna is wonderful. It's so good that I had to spend the next week finishing the leftovers myself, and I didn't mind a bit.

If I had to make one complaint, though, I'd say that I wish the noodles themselves had stayed a bit firmer. The recipe calls for the lasagna to be cooked for 65 minutes--is it possible for noodles not to turn soft after that long? I don't know. I used oven-ready noodles, as the recipe advised, but, if I ever dare to make lasagna again, I might try using regular noodles, soaked very briefly in hot water, and see how that works out.

I had planned to serve the lasagna with garlic knots, but making the lasagna was not a speedy process, and I didn’t have it in me to bake anything else. I found, though, that the lasagna goes really well served with a very simple side of vine-ripened, lightly salted tomatoes. Enjoy!

Vegetable Lasagna
Adapted from Freeze-Ahead Lasagna Primavera

1/4 cup olive oil, plus more for foil
1 medium onion, diced
4 garlic cloves, minced
1/2 cup all-purpose flour
6 cups whole milk
2 packages (10 ounces each) frozen chopped spinach, thawed and squeezed dry*
1 package (10 ounces) frozen peas
1 cup finely shredded broccoli florets**
1/2 pound carrots (4 to 5), halved lengthwise and thinly sliced
Coarse salt and ground pepper
1/2 teaspoon freshly grated nutmeg***
1 container (15 ounces) part-skim ricotta (about 2 cups)
1 large egg
1/4 cup chopped fresh parsley
1 package (9 ounces) no-boil lasagna noodles (12 noodles)
1 pound part-skim mozzarella, shredded
1 cup grated Parmesan

Preheat oven to 400 degrees. In a large saucepan, heat oil over medium heat; add onion and garlic and cook until onion begins to soften, about 5 minutes. Add flour and cook, stirring constantly, 2 to 3 minutes (do not let flour mixture darken); whisk in milk. Bring to a boil, whisking frequently; reduce to a simmer, and cook, whisking occasionally, until thickened, 3 to 5 minutes. Add spinach, peas, broccoli, and carrots; season with salt, pepper, and nutmeg. Set sauce aside.

In a medium bowl, combine ricotta, egg, parsley, 1 teaspoon salt, and 1/2 teaspoon pepper.

In the bottom of a 9-by-13-inch baking dish, spread a thin layer of vegetable sauce. Layer 3 noodles, half the remaining vegetable sauce, another 3 noodles, half the ricotta mixture, half the mozzarella, and half the Parmesan; repeat.

Cover dish with lightly oiled aluminum foil, and place on a large rimmed baking sheet. Bake 45 minutes, uncover, and bake until bubbling and browned, about 20 minutes more. Let cool 10 to 15 minutes before serving.

* I used my salad spinner to get the water out of the frozen spinach. It takes a while, but remove as much liquid as you can, or else your sauce will be watery.
** I added the broccoli because I had some to use up, but it’s optional. If you choose to add it, just shred it as finely as you can with a sharp knife until it looks like it does in the picture above.
*** The nutmeg is optional, too, but I really like the flavor. Nutmeg is often paired with both cream sauces and dark greens.

Thursday, June 26, 2008

Chinese Chicken Salad

You know, sometimes I just don’t have a story to go along with a recipe. I made this Chinese Chicken Salad last week and haven’t posted about it until now because I couldn’t think of what I should write. But you know what? I think this one mostly speaks for itself. It’s easy. It’s healthy. It’s colorful. It’s delicious. Nuff said.

I’m including the original recipe below, but this dish is easily adaptable. Use whatever nuts you like. I used walnuts, but I think cashews also would have been good. I used regular old green cabbage in place of napa because, for some reason, the former is half the price of the latter. I also served mine in (washed) cabbage leaves, just because it seemed like a good use for those outer leaves that I usually don't use. All the ingredients work wonderfully together, and the chicken, which is flavored very simply with a few brushes of soy sauce and sesame oil, is moist and tasty. The whole dish is fabulous, especially for summer.

OK, that’s it. Enjoy!

Chinese Chicken Salad
From Ellie Krieger

4 tablespoons low-sodium soy sauce, divided
2 teaspoons toasted sesame oil, divided
1 pound skinless, boneless chicken breasts
1/2 head napa cabbage, thinly shredded (about 6 cups)
1/4 head red cabbage, shredded (about 2 cups)
1 large carrot, shredded (about 2 cups)
3 scallions, trimmed and thinly sliced, greens included, about 1/2 cup
1 (8-ounce) can sliced water chestnuts

1 (11-ounce) can Mandarin oranges in water or juice (not syrup), drained
1/3 cup rice wine vinegar
1 teaspoon minced garlic
1 teaspoon minced ginger
2 tablespoons canola oil
2 tablespoons brown sugar
1 1/2 teaspoons chili-garlic sauce or chili sauce
1/4 cup sliced almonds, toasted

Preheat oven to 350 degrees F.

Combine 1 tablespoon soy sauce and 1/2 teaspoon sesame oil and brush onto chicken breasts.

Arrange in a baking dish and bake until juices run clear, about 15 to 20 minutes, or until thermometer inserted in thickest part of the meat reads 160 degrees F. Remove from oven, allow to cool completely, and then cut into bite-size chunks.

In a large bowl, combine napa cabbage, red cabbage, carrot, scallions, water chestnuts, Mandarin oranges, and sliced chicken. In a separate bowl, whisk together 3 tablespoons soy sauce, vinegar, garlic, ginger, oil, 1 1/2 teaspoons sesame oil, brown sugar, and chili sauce.* Pour dressing over salad and toss to combine. Divide among bowls and top each serving with 2 teaspoons toasted almonds.

*The dressing is good, but Adam and I both wished there was more. Consider doubling it.

Saturday, June 21, 2008

Noodle Love VII: Whole Wheat Spaghetti

It’s not often that I make a pasta dish that contains neither cream nor cheese, but I’m trying to get better. I recently found an Ellie Krieger recipe for Aromatic Noodles with Lime-Peanut Sauce, and, in the interest of trying to eat better, I decided to give it a try.

This recipe had two strikes against it from the start: 1) I’m not the hugest peanut fan and 2) I have a personal bias against anything “whole wheat,” and the recipe called for whole wheat spaghetti. I didn’t always have this bias, but we recently tried the new Papa John’s whole wheat pizza crust, and I was not a fan. Adam liked it though, so maybe it’s just me.

Anyway, the point is that I wasn’t sure how this recipe would turn out. But you know what? It was delicious! I was actually surprised how much I liked it. I really liked the flavor of both the noodles and the sauce. And it’s so healthy! Whole wheat pasta, lots of veggies, and a tasty peanut-butter-based sauce that I’m sure is better for me than the cream-based sauces I usually make.

Did I mention that Adam has been nagging me to lay off the heavy cream? Yeah, he has. It’s going to be rough, but this pasta dish is a good start.

I’m submitting this dish to next week’s Presto Pasta Nights, which will be hosted by Hillary of Chew on That. Be sure to stop by for the roundup on June 27, and visit Ruth of Once Upon a Feast for past roundups.

Aromatic Noodles with Lime-Peanut Sauce
From Ellie Krieger

3/4 pound whole-wheat spaghetti
2 cups (about 9 ounces) broccoli florets
2 cups (about 6 ounces) snow peas, trimmed
2 cups (about 6 ounces) sugar snap peas, trimmed
1/2 cup natural creamy peanut butter
1/4 cup low-sodium soy sauce
1/4 cup water
2 tablespoons rice vinegar
2 tablespoons fresh lime juice
1 scallion, cut into pieces
3/4 inch fresh ginger, finely grated
2 tablespoons brown sugar
1/4 teaspoon red pepper flakes
1/2 cup shelled unsalted peanuts

Cook the pasta in a large pot of water according to the directions on the package. Drain and rinse with cold water. While the pasta is cooking, put the broccoli in a steamer basket over a large pot of boiling water and steam it for 3 minutes. Add the snow peas and sugar snap peas and steam for 2 minutes more.

Toast the peanuts in a dry pan over a medium heat until they become fragrant, about 3 minutes. Set them aside to cool. Make the sauce by pureeing the peanut butter, soy sauce, water, vinegar, lime juice, scallion, ginger, sugar, and red pepper flakes in a food processor or blender until smooth.

Right before serving, toss the pasta with 3/4 cup of the peanut sauce. Divide into 6 serving bowls and top each serving with the vegetables. Drizzle the remaining sauce over the vegetables. Coarsely chop the peanuts, sprinkle them on top, and serve.

Tuesday, June 17, 2008

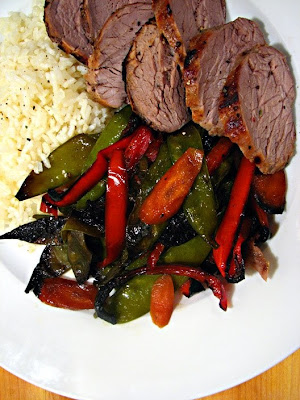
Honey-Glazed Pork with Asian Vegetables

I have issues with meat doneness. Before I got my cooking thermometer, I was a total mess. Now I’m just somewhat of a mess. I’m trying to get better about predicting doneness without my thermometer, but it’s not something that comes easily to me. Some things, I have down. I know I can sauté a chicken breast half in 7-8 minutes. I also know I can do a burger, 1/3 of a pound, to well done in 8-9 minutes. Beyond that, it’s a guessing game for me. So I usually stick with my thermometer. If I have meat cooking in the oven, you can bet it’s been spiked with a metal probe.

When I came across a recipe for broiled pork tenderloin that claimed the pork would be ready in 12-16 minutes, I was skeptical. In fact, I almost didn’t try the recipe. I’ve been in that situation where the meat isn’t done when you think it should be and you have to keep putting it back in the oven and checking it and waiting for it to finish while all your sides are either getting cold or are still over the heat and turning to mush. I can’t be bothered with that—I’ll find a recipe whose cooking times seem reasonable, thankyouverymuch. But I just couldn’t toss aside this recipe. It seemed so delicious and easy. And it was from Everyday Food, so I thought the cooking times were probably accurate, and I didn’t even use my thermometer. This recipe calls for turning the meat, which can be made a bit complicated when there’s a thermometer sticking out of it that’s attached to a cord that’s attached to a digital unit on top of your stove. I didn’t want to have any complications that close to the broiler (I’m also prone to burning myself), so I left the thermometer out.

Which was, of course, stupid of me. It wouldn’t have been that hard to use it, and I should have, because when I took the meat out after 16 minutes and checked it with my instant-read thermometer, it was only at about 130, 15 degrees off from where it should have been.

Have I mentioned yet that this pork was on a sheet tray along with some delicate vegetables, like snow peas and scallions? Well, it was. So there I was with a pan of charred vegetables and undercooked pork. I tossed the vegetables around, tried to shelter the already-charred ones beneath the not-yet-charred ones, and put the meat back in for a few minutes. I’ll spare you the entire saga, but I will tell you that I had to do that two more times before the pork was done, and the final time my instant-read hit the 155-degree mark and just kept on going, so in the end the pork was overcooked. So, yeah, remember how I started out saying that I have issues with meat doneness? This is what I meant.

If you are crazy and rebellious and don’t mind hovering around your broiler and would like to prove to me that my cooking skills, not the recipe, are what’s at fault here, please do so and report back with the results. It’s entirely possible I screwed up, although I don’t really see how. I will admit, though, that there are three reviews of this recipe online, one of which reports an experience even worse than mine, and two of which were a success. And, here’s the kicker: I actually still like this recipe—the sauce was yummy, the ingredients worked well together, it’s simple in concept—and I’ll probably try this again. I will not, however, ever attempt this again without using my thermometer right from the start. If you try this recipe and have an oven-safe cooking thermometer (as opposed to instant-read), please use it. I suggest putting the meat and veggies under the broiler, cooking for 8 minutes, tossing the vegetables well and flipping the meat, then placing them back under your broiler until the meat reaches the desired temperature. According to the recipe, that temperature is 145, although that seems a bit low to me. Other sources I’ve seen say pork should be cooked to 160. It’s true the meat will continue cooking a bit as it’s resting, but will it really go up 15 degrees? I have no idea. I mean, I don’t actually know how to cook. You knew that, right? I think I’ve made it pretty obvious here.

Honey-Glazed Pork with Asian Vegetables
From Broiled Soy-Glazed Pork with Rice and Asian Vegetables

1 1/2 cups long-grain white rice
8 ounces snow peas, trimmed
2 medium carrots, thinly sliced on the diagonal
2 red bell peppers (ribs and seeds removed), thinly sliced
1 bunch scallions, ends trimmed, cut crosswise into 3-inch lengths
2 tablespoons vegetable oil
1/4 cup reduced-sodium soy sauce
Coarse salt and ground pepper
1 pork tenderloin (1 to 1 1/4 pounds), halved crosswise
1/4 cup honey

Cook rice according to package instructions; cover, and set aside. Meanwhile, heat broiler with rack set 4 inches from heat. On a large rimmed baking sheet (cover with nonstick foil, if you have it), toss snow peas, carrots, bell peppers, and scallions with oil and 2 tablespoons soy sauce; season with salt and pepper.

Place pork on top of vegetables, and season with salt, pepper, and 1 tablespoon honey. If you have an oven-safe thermometer, insert it into the thickest part of the meat and set it for 145 degrees. Broil until pork and vegetables begin to char, 8 minutes. Toss vegetables and turn pork; drizzle pork with 1 tablespoon honey.

Continue to broil until alert sounds or until an instant-read thermometer inserted in thickest part of pork registers 145 degrees and vegetables are charred in spots, at least 6 to 8 minutes, tossing vegetables once more. Remove from broiler. Cover with aluminum foil, and let rest for 10 minutes.

In a small bowl, make sauce: Stir together remaining 2 tablespoons soy sauce and honey. Thinly slice pork and serve with vegetables, rice, and sauce.

Saturday, June 14, 2008

Mini Strawberry Loaves with Walnuts and Pecans

So I’m still working on getting through my strawberries. I have a pound or so still left in the fridge that I spared from the freezer. Today I made strawberry bread for breakfast. I’ve almost used up all the (unfrozen) berries now, and I plan on using the remainder to make strawberry lemonade tomorrow.

Making this recipe reminded me a lot of the lemon-blueberry loaves I made previously. Both recipes are from Joy of Baking, and both were made in my new mini loaf pans. There are some key differences though. The lemon-blueberry loaves seemed more cakey to me, and the strawberry bread was more like actual bread. The strawberry bread wasn’t as moist as the lemon-blueberry loaves—the former, after all, wasn’t doused with a sugar syrup at the end of baking—so it’s best served with a bit of butter, fresh and warm from the oven.

Besides adjusting the cooking time and temperature to accommodate four dark-metal mini loaf pans (decrease temperature by 25 degrees for dark metal and cooking time by 25% for mini pans), I mostly stuck to the recipe. The only additional modifications I made were using both walnuts and pecans, instead of one or the other, and adding a few gratings of fresh nutmeg. The original recipe calls for cinnamon, and for some reason when I see cinnamon in baked goods I always have to add some nutmeg. I just think they go so well together.

I’m submitting this recipe to Nutriferia’s Berrylicious roundup. Be sure to visit them soon for some great berry recipes!

Nutriferia badge

Mini Strawberry Loaves with Walnuts and Pecans
Adapted from Strawberry Bread

1/2 cup unsalted butter, room temperature
3/4 cup granulated white sugar
3 large eggs
1 teaspoon pure vanilla extract
2 cups all-purpose flour
1/2 teaspoon baking powder
1/2 teaspoon baking soda
1/4 teaspoon salt
1 teaspoon ground cinnamon
1/2 teaspoon freshly ground nutmeg
1/2 cup sour cream
1/2 cup toasted walnuts or pecans, or a mix of both, coarsely chopped
1 1/2 cups chopped fresh strawberries

Preheat oven to 350 degrees (or, for dark-metal pans, 325 degrees) and place the oven rack in the middle position. Butter and flour (or spray with a non-stick vegetable/flour spray) the bottoms and sides of 4 mini loaf pans (5.75"x3.25"x2.25"). Set aside.

Place the walnuts and/or pecans on a baking sheet and bake for about 8 minutes or until brown and fragrant. Remove from oven and let cool completely. Set aside.

In the bowl of an electric mixer, or with a hand mixer, beat the butter until softened (about 1 minute). Add the sugar and continue to beat until light and fluffy. Add the eggs, one at a time, beating well after each addition. Beat in the vanilla extract. In a separate bowl, whisk together the flour, baking powder, baking soda, salt, ground cinnamon, and nutmeg. With the mixer on low, add the flour mixture (in three additions) and sour cream (in two additions) alternately, starting and ending with the flour. Mix only until combined. Gently fold in the chopped strawberries and nuts.

Scrape the batter into the prepared pans and bake for about 45 minutes or until the bread is golden brown and a toothpick inserted in the center comes out clean. Place on a wire rack to cool and then remove the loaves from the pans. Serve warm or at room temperature.

Makes 4 mini loaves.

Thursday, June 12, 2008

Cheesy Tortilla and Black Bean Pie

I don’t have much specialized cooking gear. I don’t have a Dutch oven or a stand mixer. I have a food processor, but it’s a mini, and so it can’t do most of the things I wish it could do, like make pie dough. There’s lots of stuff I wish I had, and one of the things that’s been on my wish list the longest is a springform pan. I used to eye photos of cheesecakes jealously, fantasizing about the ones I’d make if only I had the proper equipment. Well, I finally got a springform pan, and I have yet to make a cheesecake. I have, however, made a Tortilla and Black-Bean Pie.

I found this recipe on marthastewart.com, and when I saw it I knew it’d be perfect for breaking in my pan. I loved the thought of being able to use my new toy for something besides sweet dishes. And I mean, come on, tortilla and black bean pie? That’s my kind of recipe.

This recipe is tasty and easy to throw together, and it’s great served with some chips and salsa or guacamole. The recipe calls for you to alternate layers of tortillas with a bean mixture, which consists of garlic, onion, jalapeno, corn, and, of course, beans. I started out trying to be pretty careful and consistent with my layering, but at some point I stopped paying attention and just began making layers until I reached the top of my pan. It’s really easy: tortilla, beans, cheese. Repeat. Make sure to save some cheese for the top, as well as some bean mixture if you like. Bake for about 20 minutes, until the cheese is melted and the pie is warmed through, then sprinkle with chopped scallions.

I’m including the full recipe below, but feel free to use it just as a guide. This recipe is simple to make and easy to adjust to your own tastes. Mix it up however you like. Enjoy!

Cheesy Black-Bean Tortilla Pie
From Everyday Food

4 flour tortillas (10-inch)*
1 tablespoon canola oil
1 large onion, diced
1 jalapeno chile, minced (remove seeds and ribs for less heat)
2 garlic cloves, minced
1/2 teaspoon ground cumin
Coarse salt and ground pepper
2 cans (15 ounces each) black beans, drained and rinsed
12 ounces beer or 1 1/2 cups water
1 package (10 ounces) frozen corn
4 scallions, thinly sliced, plus more for garnish
2 1/2 cups shredded cheddar cheese (8 ounces)

Preheat oven to 400 degrees. Using a paring knife, trim tortillas to fit a 9-inch springform pan, using the bottom of the pan as a guide. Set aside.

Heat oil in a skillet over medium heat. Add onion, jalapeño, garlic, and cumin; season with salt and pepper. Cook, stirring occasionally, until onion is softened, 5 to 7 minutes.

Add beans and beer to skillet, and bring to a boil. Reduce heat to medium; simmer until liquid has almost evaporated, 8 to 10 minutes. Stir in corn and scallions, and remove from heat. Season with salt and pepper.

Fit a trimmed tortilla in bottom of springform pan; layer with 1/4 of the beans and 1/2 cup cheese. Repeat three times, using 1 cup cheese on top layer. Bake until hot and cheese is melted, 20 to 25 minutes. Unmold pie; sprinkle with scallions. To serve, slice into wedges.

*I actually had some tortillas that were just under 9 inches (Piñata brand), and if you can find these they’re great. No trimming required! Also, I made an extra layer and used 5 tortillas.